Instances are virtual machines that run on the Oxide platform.
Fetch, Update, or Delete Instances
Instances can be retrieved by instance id, name, or project using the web console, API, or CLI. Because instance names are unique within the scope of a project but not globally, when fetching by instance name, the project name is required as well. See the Resource Identifiers guide for more information.
Instance attributes are mostly immutable at this time. The only modifications allowed are the designated boot disk, auto-restart policy, and device attachments. Please refer to the instance_update API docs and the sections below for more details about each type of changes.
Instances no longer in use can be deleted once they are in the stopped state. Terminating a VM does not result in deletion of the disks associated with it. Its disks are detached and remain intact.
Start, Stop, Reboot Instances
Instances can be started, stopped, or rebooted via Oxide Console, API, or CLI commands. Stop and Reboot are meant for situations when the instances can only be acted on outside the guest operating system or when graceful shutdown is not required.
Unlike invoking a shutdown from within the instance, the stop command issues a halt request to the guest operating system. The process does not coordinate with software running in the instance.
The reboot command resets the guest by pausing all devices, resetting them to their cold-boot states, and then resuming the devices. This also does not result in a graceful shutdown and restart.
Update Instances
The following attributes are modifiable for stopped instances:
Instance size: The size of an instance, as defined by its vCPU count and memory size, can be increased or reduced. See Resize Instances for more information.
Auto-restart policy: The setting determines whether an instance is booted up automatically after a planned or unplanned system outage. There are two options for it:
neverandbest_effort. If no policy is set, instances will automatically restart by default.Boot disk: The disk to be used for booting when an instance has multiple disks. If none is specified, the firmware will attempt to locate the boot disk but the boot order is not guaranteed.
Resize Instances
Oxide supports in-place modification of an instance’s vCPUs and memory, otherwise known as instance resizing. To resize an instance, stop it, modify its vCPUs and memory, and start it with its new size.
Web Console
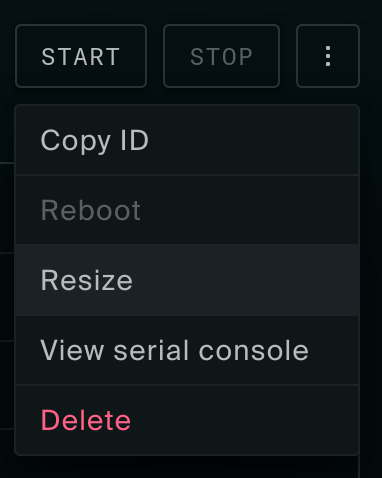
In the Instances view, click the three-dot overflow menu for an instance to show the Resize option. The instance must be stopped in order to click on Resize and open the resize modal.

In the resize modal, update the instance’s vCPUs and memory and click Resize to resize the instance. Start the instance with the new size.
CLI
# Stop instance.
oxide instance stop \
  --instance $instance_id

# Resize instance by ID.
oxide instance update \
  --instance $instance_id \
  --ncpus 4 \
  --memory 17179869184

# Resize instance by name.
oxide instance update \
  --project $project \
  --instance $instance_name \
  --ncpus 4 \
  --memory 17179869184

# Start instance.
oxide instance start \
  --instance $instance_id
Attach or Detach Disks
Disks can be added to or removed from an existing instance through the Console or API. The instance must be stopped before disk changes can be made. To detach a boot disk, you’ll also need to unset its boot disk designation beforehand.
Detached disks continue to exist until they are explicitly deleted. They can be re-attached to the same instance or other instances.
Add, Modify, Remove Network Interfaces
An instance may have multiple Virtual NICs (VNICS). Each VNIC can belong to a different VPC subnet from the same VPC. The first VNIC created at instance provisioning time is designated as the primary interface. Secondary network interfaces can be added to or removed from the instance via the Console or API.
There are several restrictions on network interface assignments and changes:
The instance must be in the
stoppedstate for any network interface changes.Removal of a primary interface is not allowed.
Secondary VNICs can only be assigned from subnets in the same VPC as the primary interface.
Multiple VNICs from the same subnet are not allowed.
The first four IP addresses and last IP address in a subnet are reserved. They cannot be assigned to an instance.
cloud-init and persisted in settings that may not get re-generated after the first boot. Before you make changes such as setting a different VNIC as the primary interface, please refer to cloud-init documentation and user guides from the distro providers on how to enable the setting changes.Attach or Detach External IP Addresses
The external IP addresses assigned to an instance can be modified under the following conditions:
The instance must be in the
runningorstoppedstate.An instance may have at most one ephemeral IP, and at most 32 total external IPs.
The semantics of ephemeral and floating IPs are listed in the Networking guide, and examples are provided as part of the Floating IPs guide.
Modify Anti-affinity Group Memberships
An instance can be added to or removed from anti-affinity groups when it is in the stopped state. An instance can belong to up to 16 groups. A group can have up to 32 members.
Resize Disks
Disk resizing is unsupported at this time, but you can create a larger disk based on an existing disk:
Stop the instance (if it is running)
Create a snapshot of the disk you want to resize
Create a disk with the new size, specifying the snapshot as its source
Detach the old disk from the instance and attach the new one